Trek 7.1 FX Review

trek-fx7

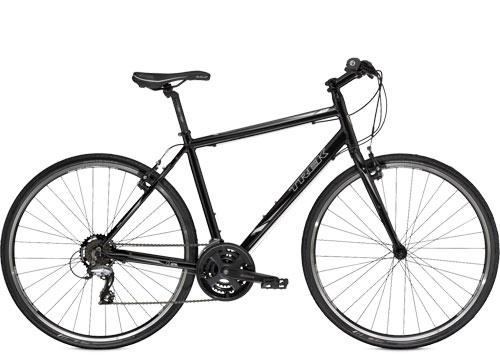
Trek 7.1 FX is one of Trek’s best selling models. For £350- £375, you get a lot of features for your money which will appeal to a broad spectrum of commuting cyclists.

It’s not surprising why it is so popular. For most commuters and newbie cyclists sticking to roads, this bike does pretty much everything you need. It is reliable, solid and gives a good riding experience without any expensive extravagances.

trek-fx7

It comes with 21 gears, and a very low ratio for getting up steep hills. Some may find the top gear of 48*14 a little on the slow side. You have to maintain a pretty high cadence to get over 25mph.

But, I doubt most people buying this will be worried at a lack of high end speed. If you are, you’re probably buying the  wrong bike, and should look at a cheap road bike.


On the downside, the bike is a little heavy and rigid. If you’re riding over rough terrain like a canal path, your hands will certainly start to feel the vibrations on these minimal handlebar grips Despite the 35″ tyres, even riding around Leeds city centre I thought it a little tough.

If you can upgrade to the next FX model like the Trek 7.2 Fx – you get a lighter weight frame and more cushioning in the handlebars.

As I am used to riding stiff road bikes, this rigidity isn’t a big disadvantage to me, but, if real comfort is important, you may want to look at other hybrid bikes with suspension and a more forgiving set up.

On the plus side of comfort, I thought the Bontrager SSR saddle was excellent. Lovely shape and padding make it really quite comfortable.
Gears within easy reach.

The gears are easy to use. Not instantaneous, but good enough given it is based on the lower end of the Shimano scale. You need to think ahead to get a burst of speed from lights, but, I was quite happy with the Shimano gears clicking away.


The brakes are Tektro lever pull – quite a common option for this type of hybrid bike. They offer reasonable, if unspectacular performance. Again an upgrade to disc brakes offers a significant improvement.

Handling

Pretty good. The set up is closer to road bike than mountain bike. Though the position can be adjusted with the riser bar. It felt nimble enough riding around town. Again solid and reliable rather than cutting edge.

Commuting

Comes with mudguard and pannier holes, that you can add onto if you want. For overall commuting, the Trek 7.1 FX is a good all rounder. Fast enough to outperform thicker mountain bike style bikes, but with a greater stability to more aggressive road bikes.

Puncture Protection

Bontrager tyres. Uncertain of how these compare over time. There are better puncture resistance tyres on the market, which can always be added to.

Overall,

This best-selling hybrid bike is popular with good reason. Trek know what a typical hybrid bike buyer is looking for. It gives very solid performance, though as someone who has ridden many different bikes, it does leave you dreaming of upgrading to get better features.

Sizing.

Trek bikes come in a variety of sizing so will fit most riders. There is also a women’s version with step through frame.

Who Would This Bike suit?

It would suit someone on a very strict budget of keeping the price down to below £350. If you’re the kind of bike rider looking for something special and a bit of zip, you will have to save more money. But, if you want a solid hybrid bike with minimum of fuss, then you can’t go too wrong with the Trek 7.1 FX.

Note: it wouldn’t be a great buy for any substantial off-road riding because the rigidity make for an unforgiving ride.

Trek FX 7.1 2015 model

Frame: FX Alpha Silver Aluminium, DuoTrap S compatible, rack and mudguard mounts
Fork: High-tensile steel w/lowrider mounts, CLIX dropouts
Front Derailleur: Shimano Tourney
Rear Derailleur: Shimano Acera M360
Number of Gears: 21
Shifters: Shimano Altus EF51, 8 speed
Chainset: Shimano M131
Chainrings: 48/38/28T
Bottom Bracket: Sealed cartridge
Cassette: SunRace Freewheel 14-34, 7 speed
Chain: KMC Z51
Pedals: Wellgo nylon platform
Brakeset: Tektro alloy linear-pull brakes, Shimano Altus levers
Handlebars: Bontrager Riser, steel, 30mm rise
Stem: Bontrager Approved, 25.4mm, 25 degree, quill
Grips: Bontrager Satellite
Rims: Bontrager AT-550 36-hole
Hubs Formula FM21 alloy
Tyres, 700×35c
Saddle: Bontrager SSR
Seatpost:Bontrager SSR, 27.2mm, 12mm offset

Related pages

Bike maintenance – Checking headset

headset

My early spring bike service and headset maintenance – what to look out for and how to fix problems.

There has been a lot of salty water on the roads this winter. It’s not been the coldest winter, but it has been dipping below freezing enough for the roads to be salted and then wet. The result is bikes ridden through the winter will have taken a battering. Everywhere in Oxford I see rusty chains – a sure sign of riding through winter salted roads. I keep using TF2 chain lube, but even regular squirts can’t stop minor rusting.

rusty-chain-white-bike

Ideally, I would leave a bike service for another month (when hopefully the salting of the roads would finish), but the commuting bike has been driven into the ground so it was time to get another service from Sherwood Mobile Bike Mechanics.

I bought a new chain and cassette for Andy to put on. I thought the brake cable had gone, but actually it was the rear brake frozen up, due to rust. Andy cleaned the brake and regreased and changed the most worn components.

I’m not too fussy about the commuting bike, but Andy felt the headset needed attention. I haven’t pain any attention to headset maintenance and have never really understood headsets – so I got Andy to write his tips for headset wear towards the end of the post. In the end it was quite a lengthy service, but that is inevitable when you cycle on it so much during the winter.

new-cassette-commuting-bike
After the service the bike runs like a completely different bike!


I keep a tight chain because I have a single ring and no front mech to stop chain dropping off.

Read more

Banbury Star Hardriders 2015

Today was the Banbury Star Hardriders 23 mile time trial from Wroxton to Ettington going down and then back up Sun Rising hill. For the first race of the season two weeks ago, I was relaxed to the point of seeing it as another training ride. But, now I’m getting more accustomed to the idea of racing. I’ve done 2,400 miles since the start of the year. It’s an unprecedented amount of training for me, and I’m interested to see if it makes any difference to speed in short distance time trials.

Although I remember many Banbury Hard-rider events which are a lot colder (snow, ice and sub zero), I was still very cold warming up. I went for 3 pairs of gloves, 3 pairs of socks  Once I got racing, it didn’t feel that cold. There was a strong Westerly wind which made the first leg into the wind quite hard. My pacing strategy was to go as hard as I could into the wind and then try and benefit from tailwind on way back.

Descending Sunrising hill was a bit tricky. It’s a sharp left hander, but the main difficulty was strong head/cross wind. Coming off the climb was hard-work because gaps in the hedge caused strong gusts of winds into the side. I was holding on very tight to the side of the tribars, looking ahead for the gaps in the hedge. It took a long time before it was safe to get back on to the tribars. Going through the village of Ettingham is also a bit tricky because of parked cars and road furniture. There were a few minor hold-ups here, but not as bad as the last race I di. On the way back it was a big relief, to turn away from the difficult headwind. You can start to pick up a good speed without as much effort. I took an opportunity to hold back a little, trying to save something for the big climb of the race.

Photo

Tejvan-richard-brian
On Sunrising hill. Photo courtesy Richard Brian.

(Note to self: Wooly socks cost 4 seconds. Tape coming off visor 3 seconds.)

Read more

Reduced to walking

You have to be careful writing a cycling blog. A couple of weeks ago I was boasting about how – in 20 years of cycling – I have never had to get off the bike and walk up a steep hill. But, the curious hand of fate has meant that just a couple of weeks later, out of the blue, I’m forced to dismount on a climb I’ve never even heard of.

forest-of-dean
Forest of Dean looks beautiful but it hides some tricky climbs. Photo Anguskirk


The day before, I had a good ride up the Tumble and the nearby Symonds Yat. The next day, I was riding around the Forest of Dean. I didn’t have a map, so just followed my nose going whichever way I felt like going. The first climb of the day started off fairly innocuously – there was no gradient sign or anything to warn you of a difficult hill coming up. When I got round the first corner it was very steep and it took a big effort to get up. In the middle there was a little recovery, but I was turning a really low cadence even on this flattish section.

There was still no gradient sign, though rather ominously I saw a sign – ‘Drivers IGNORE YOUR SATNAV’ This was rather cryptic, which should have given a greater sense of foreboding. As I went around the corner, the road veered sharply upward. Like a good hill climber, I got on the hoods and started climbing as best I could. But, it soon became apparent I wasn’t going to make it. I was heaving the winter bike up the hill, but my speed was getting slower and slower; the cadence was at a point where I was worried whether I was going to be able to turn the pedals over. If I really wanted, I could have kept trying a little more, but I really didn’t have the stomach for it. I got off and walked up the last bit of the hill.

Like any good cyclist I had plenty of good excuses for getting off and walking. Not least, having a lowest gear of 39*23 which is far too high for winter training on steep hills. I didn’t really know what I’d let myself in for cycling blind around the Forest of Dean lanes. But, even if knew what was coming it wouldn’t have made any difference.

Read more

Disc wheels

zipp-disc-wheel

Buying a disc wheel is one of the best ways to improve the aerodynamic performance of your time trial bike. They are expensive – you can easily pay over £500 (and much more). But, they do make a difference. Also, the faster you go, the more aerodynamic drag they save. Disc wheels work by smoothing the passage of side wind. Less wind turbulence means less drag and faster times.

A flat carbon disc wheel has an aero drag of 97grams. This compares to an aero drag of 154grams for a standard 18 spoke wheel (source: bsn)

The weight of a disc wheel is not as important as the aerodynamic aid. Even on the hilliest of time trial courses, you will go quicker on a solid disc wheel. Chris Boardman once used a disc wheel for winning the national hill climb championship. I don’t advise using disc wheels in hill climbs, but for nearly all time trials – aerodynamics are much more important than weight. Also if you are going to be doing a lot of hilly time trials, look to buy a light weight carbon disc – some of them are surprisingly light.

However, if you are an average triathlete or time triallist, don’t feel obliged to fork out over £1,000 for something super-light weight. If you can get a disc for £500 you will notice an improvement in aerodynamics. This is more important than doubling or tripling the amount you spend for very small marginal gain.

Zipp Disc Wheels

Zipp 900

zipp-disc

For my time trial bike, I chose a Zipp 900. It was £600 less than the Zipp Super 9, and it was lighter than the Zipp Super 9.

  • Weight: 935 g with a cassette hub
  • 11-speed compatible hub: Yes
  • Track Adaptable: Yes
  • Dimpled Surface, Lenticular shape for max aero
  • The RRP for a Zipp 900 Rear Tubular is over £1,400 but, you might be able to buy it cheaper. I got it for £1,150 from Wiggle

Review

tt-disc

I’ve been using this discwheel for the past two seasons. It helped set new pb at 10 miles of 19.02 and for 50 miles of 1.41.14. It is fast and looks cool too. Like any aero equipment it’s always hard to pinpoint how much difference the wheel has made. But, I like it.

A big bonus of the Zipp 900 is that at 935 grams, it’s not that much heavier than a deep section rear. Therefore, even on the hilliest time trials like the Bristol South CC megahilly or Buxton CC, I stick with the disc, as there is no real weight penalty and you gain a lot of speed on the downhill.

The only downside is that you need a special adaptor for a track pump, as Zipp make the hole for the pump very small.

(photo: Ken Norbury, Buxton CC)

Zipp Sub 9

zipp 900

  • Slightly heavier at 1009 grams
  • The Zipp Sub 9 combines rim technology of Zipp 1080 and Zipp 808 to try and improve aerodynamics
  • Zipp claim ’80g of forward lift at certain wind angles’
  • Zipp Disc Wheels at Wiggle

Mavic Comete Disc Wheel

One of the best disc wheel on the market. The Mavic comete is not completely flat, but lenticular shape. The manufacturer claims weight is 1160grams (tubular or clincher)

mavic-comete

  • Lenticular flange creates negative drag
  • Disc Wheel-Tyre System with full carbon dishes
  • HM carbon fibre flanges decrease weight and inertia and deliver faster acceleration
  • Weight: 1160g
  • Mavic Comete – £1,700 at Chain Reaction Cycles


Better value Disc Wheels

Fast Forward Disc Wheel

For those on a tighter budget, the Fast Forward disc wheel offers great value. At under £750 it is more affordable than the Zipp 900, but has excellent design and aerodynamics. However, it is a little heavier. Weight Clincher: 1445 grams. Weight Tubular: 1195 gram.

This is fine if you are doing flattish time trials. But, if you are doing many hill time trials, you might like to save the extra 200 grams.However, this weight is not so critical (for world Hour Record O.Sojenska actually chose a heavier rear discwheel for a ‘flywheel effect’ The Fast Forward disc is stiff and rigid. It comes with cork brake pads for the carbon rim.


When Should You Ride A Disc Wheel and When Should You Ride a Deep Section Wheel?

Using disc wheel in Circuit of the Dales (over 1,000 metres of climbing 50 miles)

  • Generally, a disc wheel is going to be quicker – even on hilly time trial courses. I have known riders use discwheels in certain hill climbs (like constant gradient of 3%) I used a discwheel when riding Crag Vale.
  • The aero benefits of a disc wheel offset the slight increase in weight.
  • At certain wind speeds, disc wheels make controlling the bike slightly more difficult (and less safe). This loss of control may lead to more cautious riding and so the disc wheel is a disadvantage. You have to get to know what kind of wind speeds are acceptable. But, be wary of gusts than can occur when you go from sheltered to exposed. However, when there are strong crosswinds the rear wheel is not really the problem; it is the front wheel which makes he tbike unstable. I can ride a disc – even with quite strong crosswinds of 25-30mph. But, as it gets windier I may take out deep section front wheel and put something with less surface area
  • Another disadvantage of a disc is that it can marginally reduce the cornering performance when riding. For criteriums, disc wheels would be a disadvantage (even if they were allowed). The extra weight makes it harder to accelerate out of corners and it is less responsive when cornering. However, in most time trials, it is very unlikely to be so technical this becomes an issue.
  • Generally, I will always try and ride the disc in a hilly time trial.

Other ways to Improve Aerodynamics

If you want to improve aerodynamics, there are also cheaper ways than a disc wheel. Even a simple aero bottle can make a big difference to aerodynamic drag. See:

Making Your Own Disc Wheel

Some try to make their own disc wheel and save a lot of money.

Related

The Tumble

tumble

I was staying in Forest of Dean this weekend, so I thought I’d cycle out to the Tumble – a climb that has featured in many Tour of Britain’s and something I’ve watched quite a few times on the TV.

tumble-two-riders
Two riders on the Tumble

In theory, it was 25 miles from the Forest of Dean to the base of the Tumble in Govilon, Abergavenny. But, I trusted my instinct of ‘remembering the roads’ from five minutes of studying the map, rather than taking it with me. I once did the National 50 mile TT on the A40 around Raglan. But, that wasn’t much help, and I ended up taking a long detour on an unknown Welsh road to Usk. I kept hoping to cut across to Blaenavon, but didn’t have much luck. At one point, I went a long way up a mountain road to be greeted by a dead end sign – right at the end of the road. 40 miles later I did finally make it to Gavilon, and in between hail showers climbed up the Tumble.

tumble-10-percent


It’s a good climb. The first half is a consistent 10% up a few hairpins, perhaps steeper in parts. As you go out of the trees, the gradient eases off a little and if there’s a tailwind you can pick up a little speed. It’s quite exposed at the top. It was popular with other cyclists, I must have seen a good 20-30 on various parts of the climb. I managed to overtake a couple on the way up. I had forgotten my cycling jacket so was just wearing loose under clothes, and had a camera swinging from thigh to thigh on the way up, which was irritating. I didn’t look the part, but still went up in a respectable time for February, on a winter training bike.

On the way back I didn’t get as lost and was able to finish off with a little climb of Symonds Yat from the Wye Valley. In the end 75 hilly, slow miles. Nice to do some new roads, though next time I might take a map.

Tumble Climb

  • Location: Wales, Govilon,
  • Distance: 5.1 km
  • Average gradient: 8%
  • Maximum gradient: 15%
  • Height gain. 399m
  • 100 climbs: #97
  • Strava segment
  • Everesting? – 23 * 10.2 km = 234 km

Read more

The worst interval session

Early in the hill climb season, I did well in some Swindon R.C. short hill climbs. After doing well on a 1 minute and 2 minute climb, I was gaining confidence in my ability for short-distance hill climbs.

dovers-hill-78
Dover’s hill – photo Cycling Weekly 1978

That week, I was training at Britwell Hill, near Watlington. I think the course record was about 2 and a half minutes.

Britwell hill

  • 0.6 miles
  • Average gradient – 9%
  • 85 metre of height gain
  • 18% max

It makes a good climb for doing intervals (the only drawback is that the road is quite narrow, you don’t want to meet a lorry coming down mid-interval). The climb starts with a gentle gradient, and gets steeper and steeper as you get nearer the top. By the end of the climb it is 18%. It is dead straight – almost  like a Ski jump and is a good place if you want to get a top max speed coming down

On this particular occasion there was a headwind, but I went full pelt right from the start. For the first minute I was averaging over 500 watts and flying up the hill. After a minute, the pain really kicked in. After 90 seconds, I was absolutely blown up and the climb just got steeper and steeper. It was torture to keep fighting up the steep climb, when you’re muscles are shot.  It took over two minutes and a half. My recent pride at doing well in short hill climbs took a battering.

Read more

Wrynose Pass

wrynose-pass

Wrynose Pass is one of the most spectacular climbs in England. In terms of difficulty, it is slightly overshadowed by its more boisterous neighbour – Hardknott Pass. But, from the East, it’s difficulty should never be under-estimated. I speak from personal experience, once dragging the bike up into a headwind and over-geared (39*25) – the 20% plus gradient never seemed to ease all the way to the top. (Such an incident inspired a recent post – about walking up hills.)

If you get chance to look back from where you came, it’s one of the most memorable views you will get from a road in England. Whilst climbing you probably won’t get chance to appreciate, so it’s worth coming down Wrynose Pass too. It’s a great natural amphitheatre.

wrynose-pass
Photo: Gouldy


wrynose-pass-gouldy
Photo: Gouldy

I’ve been up Wrynose pass on a couple of occasions, whilst visiting the Lake District. Often it involves going up Hardknott Pass as well.

Read more

Time Trial Skinsuits

It is estimated a close fitting skinsuit can save 3.2% of your total energy. [1] This equates to 29 seconds in a 40 km time Trial. Therefore a close fitting skinsuit represent a cost effective way to improve aerodynamics and save valuable seconds.

A time trial skinsuit will definitely be more aerodynamic. However, there can be a significant difference between a cheap time trial skinsuit that ends up being loose fitting and a custom built skinsuit which is absolutely skin tight.

hoy-bos-johnthescone
It may not look much difference. But, you can see more wrinkles in the Dutch skinsuit left. Chris Hoy’s British Cycling skinsuit is as good as it gets. Or is that due to Chris Hoy’s enormous muscles stretching the lyrca? Photo John the Scone


British Cycling went to extraordinary lengths to gain marginal gains through producing the best possible skinsuit. In Michael Hutchinson’s book ‘Faster’ he made the observation that the best skinsuit could give more aerodynamic advantage than upgrading to a better time trial bike. The UCI actually banned some British Cycling skinsuit because they were considered too fast. (they are somewhere in a cupboard in Manchester velodrome)

A key element in getting a time trial skinsuit, is not just the make, but also one that fits.

A good time trial suit will be uncomfortable when you’re standing up. It should feel like your shoulders are being pulled down. A time trial skin suit only works when in the time trial position.

In recent years, more of the top time triallist have been wearing custom skinsuits. Loose fitting club skinsuits seem to be on the way out for top cyclists. Which is a shame because it’s another thing which makes sport more expensive and I like seeing club kits rather than generic brands. But, if you’re competing for medals you don’t want to be throwing away seconds on flappy skinsuits.

Even in road racing, skinsuits are becoming more popular as riders try to get all aerodynamic advantages. British Cycling are pioneers in this field. Nicole Cooke’s Olympic gold in 2008 were with a skinsuit. Also the British mens road team of 2011 where Mark Cavendish became World Champion played close attention to aerodynamics.

Read more